How to Take Etsy Photos with Your iPhone

It’s up to your Etsy listing photos to show shoppers why they should purchase your item. This is true whether you’re building a new brand from scratch, selling vintage clothing online, or creating your own line of artisan soaps.
Whatever type of store you run, if you want to stand out on Etsy, you need eye-catching visuals that provide information, create interest, and look great. In other words, your Etsy product photography needs to be on point.
But what if all you have is your iPhone?
The good news is you don’t need professional equipment to capture professional-looking product photos. You can get started with nothing but your iPhone camera app.
Keep reading to learn about the importance of product photos for Etsy, tips for better product photos, and a step-by-step guide to creating high-quality Etsy photos on your iPhone.
What Makes a Great Etsy Photo?
The Best Etsy Photos Are True to Life
Great product photos accurately represent your product. They provide shoppers with a clear expectation of what they’re buying (size, color, etc.) and exactly what’s included. Otherwise, you risk an onslaught of frustrated customers and negative reviews claiming that your listings are misleading.
If there’s any uncertainty around how big or small your product might be, you should consider photographing it next to a household object to provide a sense of scale.
The Best Etsy Photos Are Detail-Focused
The photos in your Etsy listings play a huge role in the online shopping experience. Since potential customers can’t touch or try on any of the items you’re selling, it’s up to your product images to make up the difference.
That’s why it’s always a good idea to include some close-up shots that highlight key features—like stitching, logos, and other embellishments or fine details. This is the closest you can get to recreating the tactile experience of interacting with your products in person.
The Best Etsy Photos Are High-Res and High-Quality
Still not sure why it’s so important to create great Etsy photos for your store? Consider that the quality of your photographs is a key factor in the success of your Etsy shop. In fact, it might be the key factor: 90% of shoppers on Etsy say high-quality product photos are extremely or very important to a product decision.
How to Take Product Photos with Your iPhone: A Step-by-Step Guide for Etsy Sellers

1. Gather Your Props + Equipment
Prepping for a product shoot involves making sure you have all the necessary tools, props, and equipment to make your Etsy products shine. Your specific props will vary depending on the type of product you’re photographing, but you can use jewelry stands, clothes hangers, mannequins, or even something as creative as a cake stand to display your items.
Of course, the most vital piece of equipment here is the camera on your iPhone. To set yourself up for success, here are a few tips for shooting product photos on your smartphone:
- Charge Your Phone. Double check that your phone is charged so you don’t have to unexpectedly cut your shoot short.
- Say No to Flash. We recommend turning off your flash when photographing Etsy products. Whenever possible, find another light source—whether that’s natural sunlight or studio lights—to avoid unseemly white spots or reflections that might ruin an otherwise perfect shot.
- Avoid Zooming. An iPhone camera won’t capture as crisp an image if you zoom in while shooting. Instead of using the zoom feature, move physically closer to the items you’re photographing.
- Turn on the Grid. One feature you should consider using on your iPhone camera is the grid. Turning on the camera grid helps you center your object and makes it easier to stick to the rule of thirds (which can help create more balanced visuals).
2. Choose (or Create) a Simple Backdrop
What makes a perfect backdrop for Etsy product photos? Choose (or set up) a simple background that doesn’t detract from the main subject (i.e., the product you’re photographing).
Here are a few good rules of thumb to follow when choosing a background for your Etsy photo:
Choose a Background that Makes Your Product Pop
If you Google product photography tips, the most common recommendation is a plain white background. White is a great choice for ecommerce because it’s not distracting and won’t clash with your product.
However, you don’t need to limit yourself to only white backgrounds. There are some cases where it’s better to try out different background colors to see what’s truly complementary to your product.
For example, if you’re creating a listing for a sundress, then a white backdrop likely isn’t the best choice. If anything, it might wash out your dress or make it hard to discern the little details that your buyers want to see.
With Pixelcut, you can easily try out a huge range of backgrounds and colors without setting up a physical backdrop—since it’s all done on your iPhone.

Create Your Own Backdrop at Home
What if you don’t have a plain white wall or clear space to use as your photo background? One easy solution is to hang a solid-colored sheet (or even paper) behind the object you want to photograph. This creates a clean slate and simple backdrop that’ll make most products stand out.
That said, don’t be afraid to get more creative with different types of backgrounds that make sense for your brand. Interesting backdrops can change and elevate a product photo. For instance, you could try an industrial backdrop like bricks or tiles vs. a natural setting like freshly mown or raked sand to give your photos (and your store) an entirely different vibe.
Change Your Background After-the-Fact
Not sure what type of background to use for your Etsy photos? Or not happy with the way the backdrop looks in your latest photo shoot? You can play around with different options and find the perfect background using Pixelcut—no need to reshoot (or learn complicated editing software!).
3. Get the Lighting Just Right
Lighting can make or break your photo shoot. The key is to strike a balance between highlighting every detail of your item and avoiding harsh flashes or reflections that can distort your image.
Here are a few different ways you can set up the perfect lighting for your product shoot:
Go Natural
Natural lighting is always a safe bet. If you’re able to shoot on a sunny or slightly overcast day, you can play around with positioning your products near a window or even take your shoot outdoors.
Turn Off the Flash
Whatever you do, try to avoid using the flash on your iPhone camera. Otherwise, you risk overexposing your photo—which certainly won’t portray your items in their best light.
DIY Diffuser or Lightbox
What if the lighting feels too bright? Whether you go for natural or artificial light, you can use fabric to act as a light diffuser. This is a good lighting trick that doesn’t cost anything–simply hang light fabric over the light or in front of your window to achieve a softer look.
Or, if you’re feeling crafty, you could even create your own lightbox to get that perfect shot.
Touch Up the Lighting in Post
Still having trouble with lighting? Not sure how to create the perfect balance? Don’t panic! The good news is that even if the lighting isn’t perfect during your shoot, you’ll have the opportunity to touch up your product pics in post-production—without resorting to Photoshop.
After you’ve finished taking your pictures, simply upload them to a photo editing app like Pixelcut and adjust the levels and brightness to get the right look.
4. Stage Your Photo
Don’t overlook the importance of styling and staging during your photoshoot. Think about the right types of photos to take for your product. Consider what props to use and products you might want to shoot together and take shots from a few different angles to see what turns out best.

A good starting point is to familiarize yourself with different types of product photos, including:
- Studio Photos: Your basic studio-style image provides a clear image of the product without any props or distractions in the background.
- Lifestyle Photos: Lifestyle images showcase the product in use in daily life. For example, if you’re selling a hand-knit beanie, then your lifestyle photos might include a model (or yourself) wearing it against a snowy backdrop.
- Detail Shots: Detail shots allow shoppers to get up-close and personal with your products. This is especially helpful for capturing smaller items, like if you’re photographing earrings, as well as handmade goods that might include small-but-important details, such as hand-stitching, cute decals, and engravings.
- Sense of Scale Photos: It can be hard to visualize the size of some products, even if the dimensions are listed in the description. Including a sense of scale shot in your listing helps customers understand the actual size of your product. You can capture the sense of scale by photographing your product next to a standard household object (like a smartphone, hand, or even a ruler) to showcase its true size.
- Collection Shots: Like wine and cheese or needles and yarn, some things just make more together. So, you may want to photograph several items together–especially if they’re part of a product line. For example, do you sell a series of art prints on your Etsy shop? What about matching his and hers tumblers? These are great cases for collection photos, which feature the listed product next to several complementary or related items from your shop.
5. Post-Production Editing
Once you’ve finished snapping all your photos, it’s time to do a bit of polishing before uploading them to Etsy. Whether you’re adjusting the brightness, changing the background, or cleaning up edges, there are quite a few ways you can elevate product photos with an iPhone app.
With the right editing tool, you can turn a basic image into a stellar product photo for your Etsy store—all from your phone. This is one of the benefits of using your iPhone camera for product photos: It’s even easier to upload your Etsy photos directly to an editing app like Pixelcut.
Note: This step is particularly important when you’re using a smartphone camera since you can’t dial in the settings as specifically as a professional could using a DSLR.
The Best Way to Edit Etsy Photos on iPhone
Pixelcut is ideal for Etsy store owners who want product photos that attract shoppers and drive sales. With a huge collection of ecommerce-friendly templates available, Pixelcut makes it easier than ever to create Etsy photos that stand out and look great.
Anyone can use Pixelcut templates to create professional-looking product photos in just a few taps. Ready to see how? Follow along with the steps below to see how quickly you can go from template to custom product image for your Etsy store.
Step 1: Select a Product Photo Template
Want to create a cute product photo fast? Start by choosing your favorite ready-to-use template from Pixelcut’s “Create” page.

Once you choose a product photo template, you’ll be able to swap out the main image with your Etsy product photo.
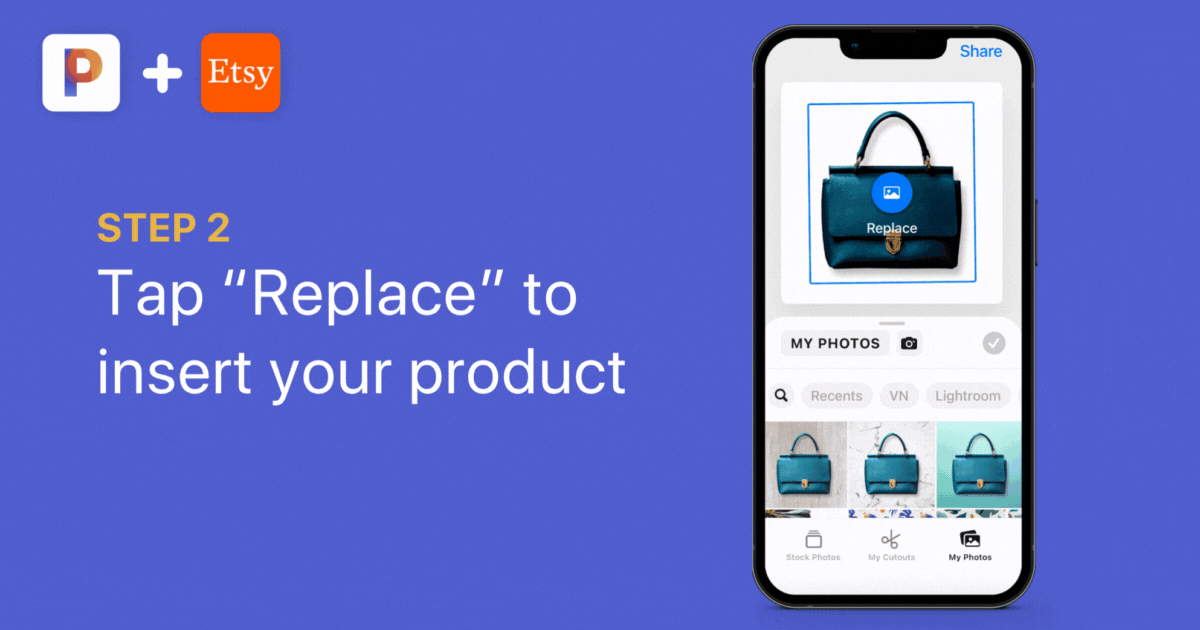
Step 2: Tap “Replace”
Next, you can replace the object in the template with your own photo. Simply tap “Replace” and then select the photo from your album.
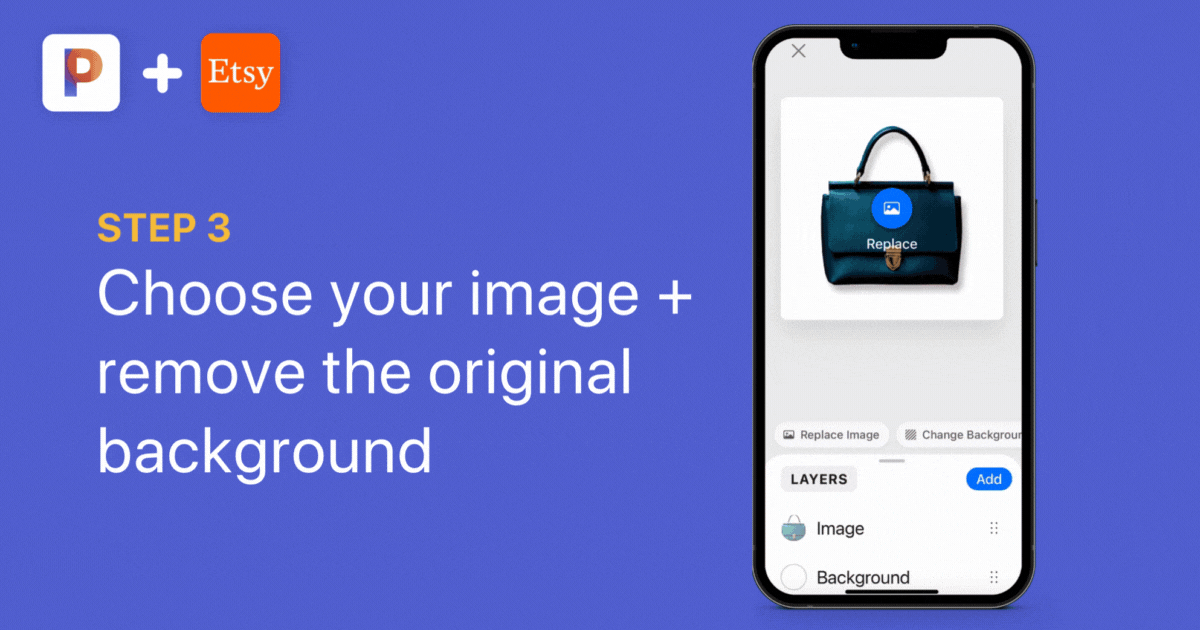
Step 3: Add Your Image + Remove the Original Background
Once you’ve selected your product image, it’s time to remove the original background. Just swipe your finger along the slider and Pixelcut will create a cut-out—so you can add your product to the template.
Note: If you’ve already created cut-outs of your product using Pixelcut, you can always replace the stock photos with one of those.
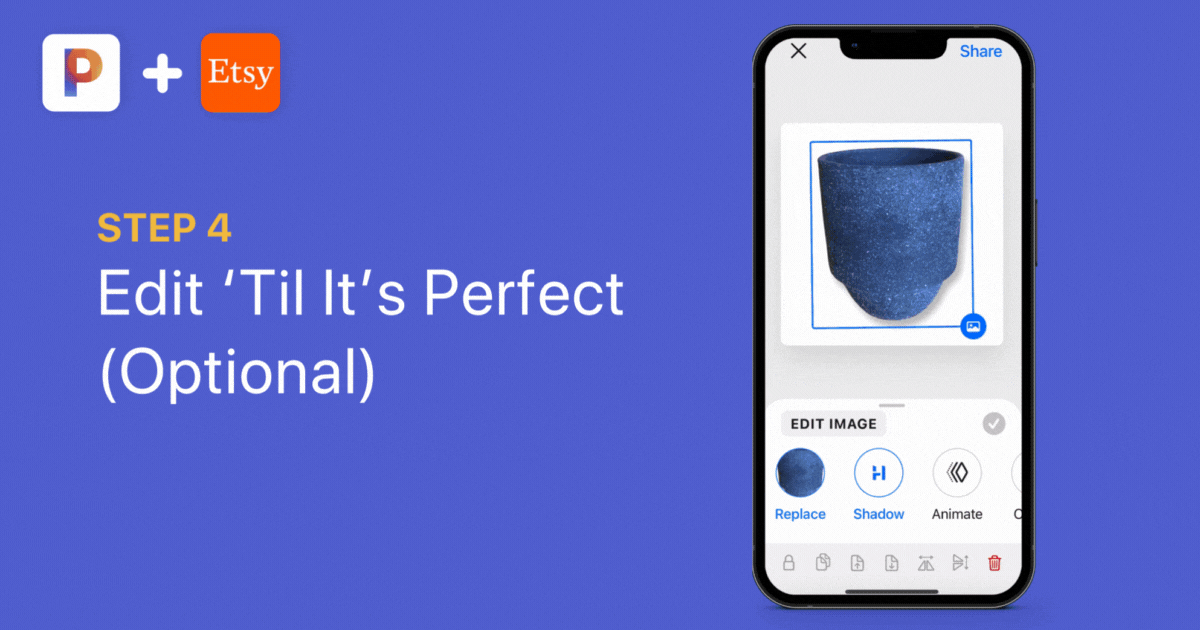
Step 4 (Optional): Edit ‘Til It’s Perfect
Once you’ve got your product photo and the background of your choice, you can play around with tons of other editing options, including special effects, lighting adjustments, and filters.
And that’s it! You’re ready to upload your new product photo to Etsy.
Start Creating Better Etsy Photos on Your iPhone
When it comes to creating amazing Etsy photos, the editing process doesn’t have to be difficult. Whether you want to add or remove a photo’s background, adjust the lighting and colors of your product photo, or use a template instead of starting from scratch, Pixelcut is the ideal editing tool for Etsy shop owners.
Discover Pixelcut’s wide range of backgrounds and templates for ecommerce photos. Pixelcut is a fast, fun, easy-to-use tool for creating high-quality images for your Etsy store—using only your iPhone.
Plus, with Pixelcut Unlimited, you can edit multiple images at once to apply the same filters and adjustments to several photos. This makes it easier than ever to maintain a cohesive style on your Etsy store and create a set of on-brand product pictures.
Ready to elevate your Etsy photography? Download Pixelcut and start creating perfect Etsy product images from any of the photos on your iPhone.
Ready to start creating with Pixelcut?
Join more than 70 million small businesses, creators and entrepreneurs that use Pixelcut to grow their business.